Showing posts with label truck. Show all posts

Friday, October 30, 2015

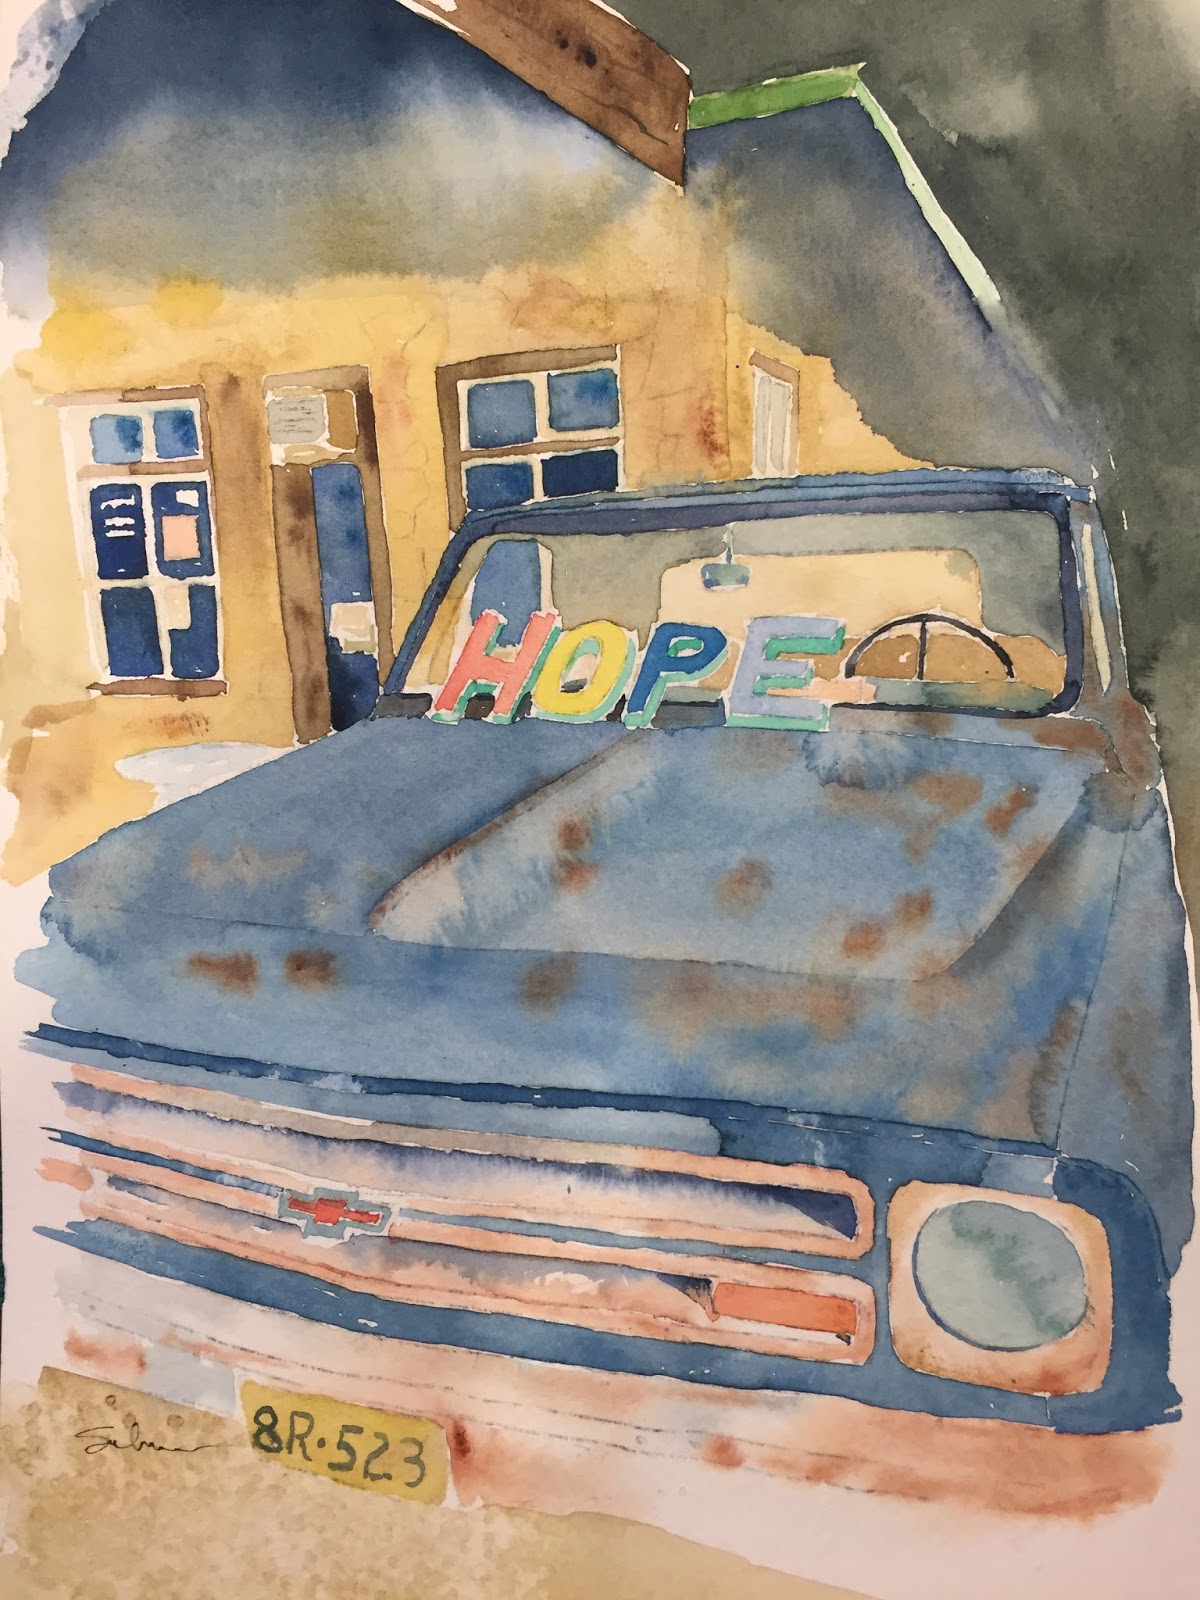
Old Blue Chevy Truck (HOPE Truck)

This is my latest painting.  It is the HOPE truck from Dripping Springs, Texas.  A friend of mine took the picture and it was too much for me not to paint it.   I had a great time with this.  I love all the rust and faded colors.

Painting the shadow and darkness at the top of the painting (under the eaves and the tree shadow behind the building) was completely terrifying to paint.  I had what I thought was a good painting, but needing the shadow and I had to put it on.  the color is so dark, I was afraid I would totally mess it up.

Luckily, I like the way it turned out.

I was told that maybe i should have left the windows jus ta bit lighter, and darkened the ground below the truck.  Hmmm.  Something to think about.

I love this painting.  It is hanging proudly in my office.  I'm so juiced at the way this one turned out, I can't wait to paint my next one.

Oh, and by the way, if you want to see how I did it, I do have a video.  Thanks for the quick read.  Hope you love the truck as much as I do.


Tuesday, October 20, 2015

Truckin' through a field

For some reason, I felt the need to paint another old truck.  I just cant seem to get enough of rust and faded paint.  So here it is, an old Ford sitting in a field.  It looks like its been here for about a dozen years or so.  No wheels at all, so it is never gonna move.

I love the effect of the distant trees in this painting, and I can live with the sky.  I only wish I had painted the truck in my usual way.  One piece of sheet metal at a time.  It usually allows for nice breaks in the painting and I don't have to paint the joints between the panels.

Well, I like this and even the field seems to have a lot of texture to it. Enjoy.

Oh, and by the way, it comes in video too.  Check it out.


Tuesday, September 9, 2014

Old Truck in Front of Barn

Ok, first of all, let me say that this is still a work in progress.  Secondly, let me tell you a little story about this.

A colleague of mine, knowing my propensity for all things rusty and wheeled, sent me a picture he took of this truck.  I couldn't help but attempt a painting of it.  I drew it, and painted it.  It looked horrible.  I couldn't stand it.  Even my colleague looked at it and asked if I had regressed in my painting.

I literally started pouring on the water and rubbed most of the paint off the truck.  Having done that, I was left with a painting that still had color, but which was infused with tiny white dots where the paint had been taken off.  It still looked horrible.  So, here is what I decided to do.

I admitted to myself that I'd wasted a sheet of paper and used it for some practice.  I stood, instead of sitting, and started swabbing on paint, not worrying about color or exact placement of paint.  In short, painting more loosely.  You can see I got some red on the roof of the bar,  a big swab of blue on the side of the barn, some green for trees, and yellows, reds and greens for grass.  While still wet, I just flicked in a few weeds.  I touched up the paint on the truck, and POW, a huge difference. I couldn't believe the transformation of this picture. It went from something that was totally drab and blasé to something in which the truck actually stands out in the picture.

I know that I still have a little bit of work to do painting but I couldn't believe how much better it look when I stopped trying to paint so tightly.

I hope you all enjoy it I am going to be posting the finished painting soon. Thank you.

Friday, January 25, 2013

Last One of This Series

Well, at long last I have come to the end of painting old rusty trucks.  I'll do some more of them at some point in time, but right now, it's time to move on.  I've really enjoyed painting them, and have learned a ton.  Also, I've learned there is a ton more to learn.  Oy Vey!  Well, it's a good thing I'm still having fun with it and want to keep going.  I really do think this is the best one I have done.  I'm posting several pictures again this time too.  I got some good feedback about it last time and am going to try to incorporate pictures of the steps more often.

 Here is the start.  A simple drawing.  Only the truck and a little bit of the fence.  I've moved the center of interest off the center of the paper.  Hopefully, it make the painting just a bit more interesting.

The underpinning of the truck body.  You can see the green and red as well as the rust color.  More layers to come.

I'm not sure this is the perfect place to start, but I get so hyped to see the truck come to life that I start with it.  I may have made a small mistake by painting the bumper at this point, but I can fix it later if I need to.

Background, and foreground go in.  Nothing with any detail, just some basic colors.  Note there is just a hint of blue for a sky.   Trees will cover the rest.  I'm not sure why I did the inside of the cab and the grill.  Mostly I think it was because I was being interrupted while I was painting and that is just how it turned out.  Also, you can tell I added another layer to the truck body.

A few trees and some shadows.  I am thinking of leaving the trees like this, but they look a little to airy.  I think I will eventually have to paint a layer over them.  Some shadowing under the front clip of the truck and it really comes to life.  It's amazing what a little color can do some times.

Well, I painted over the leaves of the trees in the background.  I've got to do all my detail work on the truck now before I put the foreground on.  I have to do this so that if I paint over the truck with the foreground, it will really push it back into the painting.    At this point, I'm worried about the grill.  The picture I'm painting from shows the grill as black, or at least really dark.  I don't want it to be a big black hole in the center of the painting.

This painting for sale.  9x12  $30
Here it is, the finished painting.  The wheel is done, the grill is done, and the weeds help to push the truck back into the painting.  I think it turned out great. I couldn't be happier with it.  I hope you all like it too.


Wednesday, January 23, 2013

Another Old Truck

So I thought I would let you all see the steps I take to create a painting.  We'll start with a drawing and go through the final product.  I've kind of wanted to do this for a while now.  I think it is much more interesting than just seeing the final painting.  I apologize for the quality, or lack there of, some of the pictures.  instead of scanning all the picture, i just snapped a photo with my phone (wow, doesn't that sound funny?).  While I did use the flash on it, and the picture is under a light, I somehow still get grey spots on the photos.  So, without further adieu, here we go.


Here we are with the drawing.  Not too  much detail.  The truck has a lot of detail, but the foreground and background not too much.  I go back and forth between wanting more, and wanting less.
This is the first layer of paint.  It is this layer that will add the color that you will see on the truck.  You can see the reds, yellows, blues and greens.  Even though more coats of paint will go over the top, this layer will always be able to be seen.
Here is the second layer of paint on the truck body.  At this point I need to decide if I like the color or not.  If not, I'll add another layer to change the color.  What do you think from the final painting, did I add a third layer?
Here I've added a blue sky and some trees in the background.  Notice that the truck still isn't done.  What I have left is mostly detail work.  I like to leave that till the end.  Since a lot of the detailing is at or around the edges of the truck, I want to get the mid-ground and the foreground in place so that I can paint over it if I need to.
Nearly done now.  You can see I've go the grill done, and the shadowing in the cab, wheel wells and around the grill.  I've put some shadowing on the truck itself.  The last detail is to put in some weeds in the foreground.  Adding the weeds will help to push the truck back in the picture a bit.  This is also a good time to mention the red in the foreground.  I think I've mentioned it before, but red tints make things look closer, blue tints make things look further away.  Just look at the mass of trees int he middle of the picture.  They are clearly bluer than the trees around them and look much further away.
This painting for sale.  9x12  $30

And here is the finished product.  The truck sitting in a field rusting away with some weeds growing around it.  Hope  you all enjoy it.


Friday, January 18, 2013

Old Blue Truck

SOLD!
Ok, so I tried to do something that may not have worked out quite the way I wanted it to.  Then again, some parts of this painting are brilliant 

So, I started with a picture of this truck.  Someone had photoshpped it so that the only thing in color was the truck.  It absolutely burst off the page because it was a beautiful blue color.  (Well, actually it was blue, yellow, red and rust, but for the ease of this commentary, I'll just call it blue.)  The truck was sitting in the wood with tree trunks and branches all around.  I didn't think the background was all that exiting, but it made the truck jump out so much that I had to try it.  Well, as you may have guessed, I didn't use their background, I used my own.  Yes, thats right, just made it up on the fly.  I wanted to make my background a little darker around the truck and a little lighter everywhere else, but it didn't quite work out that way.  Oh, well, there is always next time.  One think I did  do, and you will have to look closely to see it is make the grey in the background more blue-grey, and make the foreground more red-grey.  If you look closely you can see it.  I did it because the blue makes things look more distant, and the red, more close.

As for the truck itself, I think its pretty good.  I did a lot of layers to give the truck the kind of mottled look.  The first was just water to get everything wet.  Then came yellows and reds.  Finally, blues on top. I tried to allow for highlights along where there were bends in the metal, but I didn't work out well this time and I quickly abandoned that plan.  As you look at the truck, take not of the lining.  Instead of making lines at the end with a pen, i actually used paint and brush and painted it.  Some of them look a little better than others, but in general, I think all the lined came out pretty good.   I like this painting and already have it hanging in my office.  Next week, I start a new painting.  Enjoy

Thursday, January 17, 2013

Here is what I am working on

Just  little preview.  I've begun working on my next painting.  No, I don't really want to be known as the painter of trucks, but I don really like old trucks.  I apologize for the greying of this picture.  My scanner bed is just a bit too small for the size of paper that I paint on.  Where it comes off the glass, a little greying appears.  The further away fromt he glass, the more grey.  I might blue this up a bit more, though I really like the way it looks right now.  I'm also considering doing the background in sepia tone.  My hope would be that it would really make the truck stand out.  I've still got all the shadowing to do on the truck too.  Hopefully next time you see this truck you will see the WOW Factor.  Enjoy

Wednesday, December 5, 2012

Another Old Truck

THIS PAINTING SOLD
Another old truck. And surprise, its the same one as before.  The previous one is gone, off to someone else to look after it and I liked it so much I had to have one of my own.  Thus, this second painting of it.  I did a few things differently on this one.

First, i tried to make the hill on the right hand side a little more mottled.  It looks like there is some texture to it now.  Additionally I made it a little bluer.  It really makes it look like it recedes off in the distance.  I also tried to put in another level of weeds around the truck.  I thought this would really make it look like the back is way back and the front much closer.  I don't know how successful that was, but I don't think it takes away from the picture either.

The truck is mostly the same.  As I learned to paint shadows, I learned that they should be a blue grey and laid over top of the underlying color.  I 'm not sure that that really makes for the best shadow areas. on this one, I tried to just put in a little darker more intense coloring in the corners so it looks like a bit of a shadow but nothing too harsh.  Looking at it, I probably could have been even more aggressive with the color.

All in all, I am really proud of this one.  I think it is at least as good as the first one.  If anyone wants to buy, I'll sell.  Just send an email and we can talk terms.

Monday, November 19, 2012

Top Dog Coffee Shop

Ok, here it is, the Top Dog Coffee Shop in Morro Bay.  Its right on Main Street.  I had a little harder time with this than the old truck.  I think it got started with the number of vertical lines I had to draw.  It followed through with the tables and chairs in front.  II think it came out pretty well but you will have to be the judge.

Friday, November 16, 2012

Things to Watch for Next Week

Just a quick look at what is coming up next week.  I've got a good start on the Top Dog Coffee Shop here in Morro Bay.   The lower picture is another one of Giovanni's Fish Market.

Seeing the pictures in various states of finish will also give you a little insight into what I go through in order to create these paintings.

Enjoy

Wednesday, November 14, 2012

Old Truck in a Field

SOLD!
This was a great picture to paint.  I lived doing it.  The picture I took it from was really dark, and I wasn't sure I would be able to lighten it up and still keep the same look.  I think I did a pretty good job.

Well, I tried to make the colors of the truck and the grasses in front of it brighter and more intense that those at the top.  That pulled the truck foreword in the picture.  It really does look like the field in the top right hand corder is a long way off.  Also, I tried the trick with the ground in between the rows of vines and the vines themselves.  They are darker the closer you get to the bottom of the picture, indicating that they are closer to you.

The chrome was a challenge.  How do you paint old rusty chrome.  Well, the answer for me was not too.  I merely made the chrome stilghtly different colors away from what I thought would be the most reflective part.  So between the top of the hood and the diamond in the middle of the grill, the chrome is brightest (again, allowing that to seem further toward the viewer).  As the chrome goes back from there, it gets darker, and of course as it goes down it gets darker.  If you look closely, you can see different colors in the chrome.

I tried to paint the body of the truck in different sections as they would have been put together.  The door, the cab, the bonnet, the fenders, the grill, each got painted at different times.  I was hoping they would come out slightly different colors to make it seem as though the paint is oxidizing at slightly different rates.  You will have be the judge.

My favorite part of this painting is the big dark front wheel.  It turned out great.  The color, the shadow, even the hub.  I love it.

Hope you all enjoy viewing this as much as

Friday, July 6, 2012

Broken Down and Rusting

Firstly, let me apologize for the quality of this image.  The size of the painting is larger than my scanner can hold so I had to snap a pic with my camera.  Obviously it didn't do quite as good a job as the scanner.

I've had a book of great pictures from across America for quite a while now.  One of the pictures had a truck in a field in front of a barn.  I like the truck a lot, the barn, not so much.  So here is my take on the truck.

When I drew the truck, I was thinking to myself, just dont screw it up.  When I had finished I thought I did a pretty good job, and wanted to take a picture so I could use the image again.  Then I though, if i can draw it once, I ought to be able to draw it again.  So I forged ahead with painting.  Then as I was painting the parts of the truck I kept thinking, don't screw it up its a long process to get back to where you are.  But in the end,  like the way it turned out.  I might to another one of these, but it wont be for a while.  I think I'll have more confidence in painting it knowing that I've already been able to do it once.


Painting is 11x15
For Sale - $20 - free shipping

Wednesday, June 13, 2012

Drawn By Lindy, Painted By Michael

Lindy was so proud to draw this truck for me.  I drew one for him too, and we sat down together to paint them.  As you can see, this truck has an engine in the front and one in the back.